CONTENTS
- What is Dimplex Capa?
- What is a Site?
- How can I share a Site with a friend?
- Adding a heater to a Site
- Having trouble connecting a heater?
- What is a Zone?
- Troubleshooting offline heaters
- Zone settings
- What is a schedule?
- What is an override?
- Automatic updates
- How to set up Dimplex Capa voice assistant
- Privacy policy
WHAT IS DIMPLEX CAPA?
Dimplex Capa is a mobile application that allows you to control WiFi compatible heaters from Dimplex. By reducing the heating during periods when you are asleep or away, energy is saved without compromising your comfort.
Dimplex Capa is compatible with Dimplex Alta WiFi heaters from Dimplex.
A smartphone or tablet with minimum iOS 10 or Android 7 is required to set up the system. Android 6 units can also download and run the Dimplex Capa app, but cannot be used to add new heaters to the site.
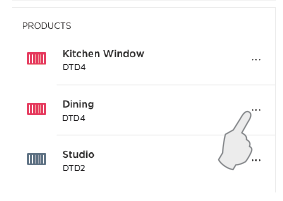
WHAT IS A SITE?
Dimplex Capa allows you to organize your heaters within a SITE. A site can typically be your home, cottage or similar. Any number of sites can be created and connected to one user account.
You can share a site with other users by sending them an email invite. Enter the Settings screen and tap Users to edit the user settings.
If you have received an email invite to a friend's site, you need to create a user account with the same email address to gain access. If you choose to log in with Facebook, please ensure that your Facebook account uses the same email address as the one used for the invite.
ADDING A HEATER TO A SITE
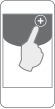
To add a heater to your site, press the “+” button in the top, right corner of the Control screen.
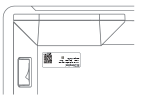
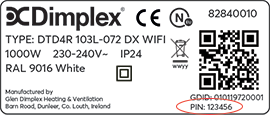
Enter the product identification code (GDID) and PIN code. Both codes are found on a label at the back of the heater. The codes can be entered manually, or by scanning the QR code on the label.
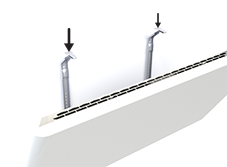
For better access to the label when the heater is wall mounted, the heater can be tilted forward by pressing down the two top catches on the wall bracket.
Next, the heater needs to be paired with your WiFi network. This is done by activating the Bluetooth (BLE) discovery mode on the heater. Please consult the heater manual on how to activate BLE. Make sure Bluetooth is activated on your smartphone or tablet, and follow the instructions in the app. For Android devices, device location services must also be switched on.
Select your preferred WiFi network from the list and enter the WiFi password when prompted.
HAVING TROUBLE CONNECTING A HEATER?
- Make sure location services is switched on on your phone or tablet before activating the Bluetooth scan. (Android only). Location services is necessary in Android 7+ in order to scan for Bluetooth devices or WiFi networks.
- Go to the Bluetooth settings on your device and remove any listings named "Dimplex" from the list of connected units. Then try again.
- The Dimplex WiFi-system operates at 2.4GHz. If your WiFi router has both 5GHz and 2.4GHz, make sure the 2.4GHz is activated and selected.
- If the app prompts you to insert a PIN code, please use the PIN on the label at the back of the heater.
WHAT IS A ZONE?
A zone can represent a real room, a floor or area that should follow the same functions. Heaters that are supposed to follow the same weekly schedule and temperature settings, should be placed together in a ZONE. One example could be all the heaters in your living room.
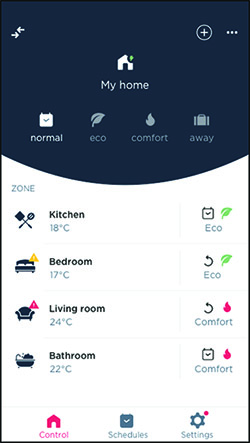
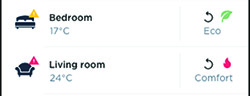
The Site Control screen contains a list of zones and shows the current status of each zone. In the blue area at the top, the mode of the entire site can be set by pressing one of the four mode icons. A mode change for a single zone is done by pressing the right hand side area of the zone bar.
A red or a yellow warning triangle is displayed when all, or some, of the heaters in a zone are offline. A red triangle means all heaters in the zone are offline. A yellow triangle means that some, but not all, heaters in the zone are offline.
TROUBLESHOOTING OFFLINE HEATERS
Press and hold all three buttons on the heater control.
A light on the heater will start flashing in one of the colours below:
Red light:
The heater is not connected to the local network. Please try the following:
Turn the heater off and on again.
Move the heater closer to the WiFi router.
Make sure the Wifi password is correct. The WiFi credentials can be changed by entering the zone settings and selecting options for the heater. Then press "Change Wi-Fi connection". This will prompt the Bluetooth setup process to be repeated for the heater.
Yellow light:
The heater is connected to the local network, but not to the cloud services. Please try the following:
Check the internet connection via a different device to ensure the network is up, then turn the heater off and on again.
If this does not work, the cloud services might be down. Please try again later.
Green light:
All is well, and the warning icon will disappear shortly.
ZONE SETTINGS
Tap the Zone bar in the Control screen to enter the Settings screen for a Zone.
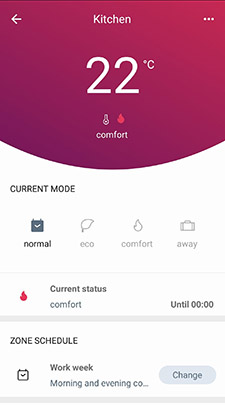
Select a weekly zone schedule as the normal mode of operation for the zone. If no other selection is made, the default schedule is a 24 hour Comfort schedule.
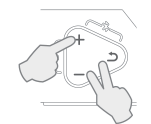
You can set your preferred Comfort and Eco temperatures according to the use of the room. For example; the Comfort temperature in a living room could be very different from the Comfort temperature in a bedroom. Tap the Comfort or Eco mode buttons to switch between modes. The temperature settings apply to all the heaters within the same zone. You can also set the temperature directly on any heater in the zone. A change in temperature setting will automatically be synchronized to the app and to other heaters within the same zone.
WHAT IS A SCHEDULE?
Each zone has a selected weekly SCHEDULE telling the heaters in the zone how to act during a week. When in normal mode, the zone follows the selected schedule. To create a schedule, enter the 'Schedules' screen and press the + button. For each day of the week, up to 4 distinct periods can be added and specified as either COMFORT, ECO, AWAY or OFF. The first period of each day must start at 00:00. The last period of each day will always last until midnight.
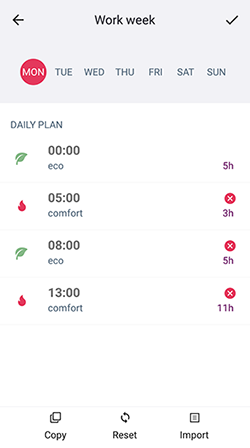
COMFORT periods:
Comfort is normally applied to periods when you are at home, and would like a comfortable temperature. Each zone has its own, independent, Comfort temperature setting. Your preferred Comfort temperature can be set in the zone settings screen in the app. You can also set the temperature directly on any heater in the zone. A change in temperature setting will automatically be synchronized to the app and to other heaters within the same zone.
ECO periods:
Eco is normally applied to periods during the day when you are out, or at night when you are asleep. Each zone has its own, independent, Eco temperature setting. Your preferred Eco temperature can be set in the zone settings screen in the app. You can also set the temperature directly on any heater in the zone. A change in temperature setting will automatically be synchronized to the app and to other heaters within the same zone.
AWAY periods:
Away is normally applied when a zone is unoccupied for an extended period of time, but still needs to keep a base temperature. Away temperature is fixed to 7°C and cannot be altered.
OFF periods:
OFF makes sure all heaters in the zone are switched to standby mode. Off is normally applied during periods when the zone has no need for heating at all.
WHAT IS AN OVERRIDE?
The normal weekly schedule can be set aside temporarily, if other needs arise. This is called an override. A override interrupts the normal schedule for a limited time, replacing the schedule with one of the alternative modes: “COMFORT”, “ECO” or “AWAY”. Overrides can be applied to the entire site, or to individual zones. Applying an override to the entire site terminates any active overrides on zone level.
The duration of an override can be defined as either CONSTANT, UNTIL NEXT SCHEDULE CHANGE, or UNTIL DATE.
CONSTANT:
The override lasts until you choose to stop it manually. The override is useful if the time for return to normal mode is uncertain.
UNTIL NEXT SCHEDULE CHANGE:
The override lasts until the next event in the weekly schedule. Each zone will return to normal mode at the moment when there is to be a switch between periods in the schedule. In the case of a weekly schedule with no switches, the override is terminated at midnight.
UNTIL DATE:
The override lasts until a selected date and time.
AUTOMATIC UPDATES
Dimplex Alta WiFi panel heaters receive software updates to ensure the latest version is always installed. As soon as the heater is connected to your local WiFi, the latest software is downloaded automatically, to ensure you always have the newest functionality.
During a software update, the heater display and buttons may become unresponsive for a few minutes. Please wait and try to operate the heater again later.
PRIVACY POLICY
GDC Group Ltd (registered in England and Wales No.01313016), Ability Projects Ltd (registered in England and Wales No.04088764) and Glen Dimplex Heating & Ventilation Ireland uc (registered in Ireland no. IE00049461) are trading as Glen Dimplex Heating and Ventilation (“GDHV”). GDC Group Ltd and Ability Projects Ltd are at Millbrook House, Grange Drive, Hedge End, Southampton, Hampshire, SO30 2DF. Glen Dimplex Heating & Ventilation Ireland uc are at Barn Road, Co Louth, Dunleer, Co Louth 221213. Together with any group companies (“we” “us” “our”) are committed to protecting and respecting your privacy. For the purposes of data protection legislation, we are the data controller and we will process your personal data in accordance with the General Data Protection Regulation (EU) 2016/679 and national laws which relate to the processing of personal data. Please read more here to understand our views and practices regarding your personal data and how we will treat it.
HOW TO SET UP DIMPLEX CAPA VOICE ASSISTANT
Install Google Home and Google Assistant apps on your device
Google Home users may have the following steps already set up
- Install the Google Home app on your device (from Google Play or the Apple App Store).
- Install the Google Assistant app on your device (from Google Play or the Apple App Store).
- Create an account or sign in with an existing account
- Run through the setup process of adding a Home
- Add your Google Home speaker to the home you created – please ensure that when setting up the speaker that you have enabled “Personal Results”, otherwise the skill will not work.
Add English Language to your mobile device
The Dimplex Capa action currently only supports English. If your device is set up with any other language, this step is important.
- Open your device settings
- Ensure English is the selected language.
Add English Language to your Google Home
The Dimplex Capa action currently only supports English. If your device is set up with any other language, this step is important.
- Open the Google Home app

- Tap Account

- Tap Settings
 , then Assistant, then Languages
 - Tap Add a language
- Select English UK (or English US)
Load the list of available actions
Android:
- Open the Google Home app.
- Tap Account
- Tap Settings and then Services tab and then Explore

iOS:
- Open the Google Home app
- Tap Account
- Tap Explore
Search for Dimplex Capa
When at the list of actions - search for “Dimplex Capa” – the following will appear:
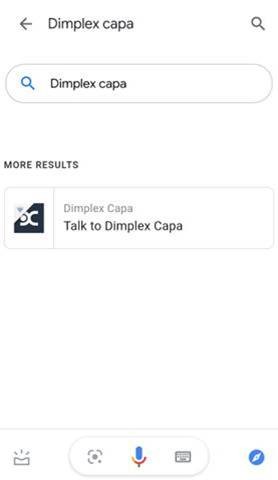
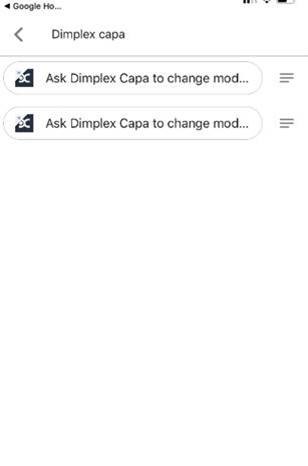
2. Tap on the Dimplex Capa icon (Android) – or the menu icon on the right (iOS)
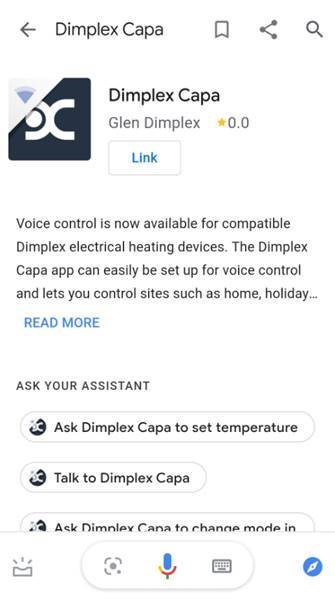
3. Click on the “Link” button. This will launch the Dimplex Capa login page
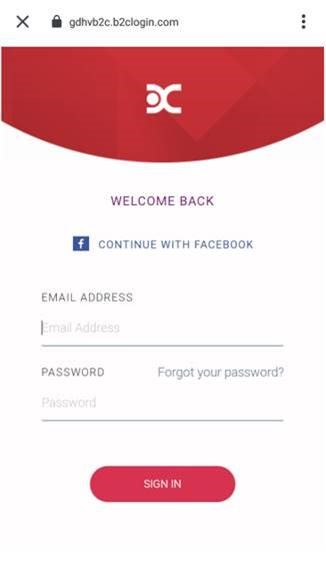
4. Sign in with your Dimplex Capa account
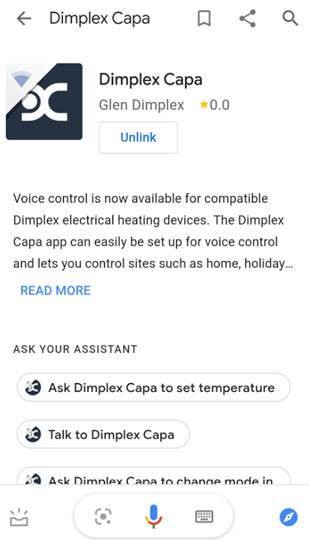
5. When you return to the Google Home app – the “Link” button will now say “Unlink”.
Ensure your Site Names and Zones are in English
- Open the Dimplex Capa app on your device
- Ensure any sites you want to control have a common English name, eg: Home, Cabin, House, Office, etc
- Ensure any zones have a name that was in our predefined zone list.
|
Space/ Category |
Zone Names |
|
Home |
Hallway, Kitchen, Living Room, Dining room, Bathroom One, Bathroom Two, Bedroom One, Bedroom Two, Bedroom Three, Bedroom Four, Storage room, Upstairs, Downstairs, Room One, Room Two, Room Three. |
|
Office |
Floor One, Floor Two, Floor Three, Office One, Office Two, Office Three, Kitchen, Reception, Room One, Room Two, Room Three. |
|
Holiday Home |
Hallway, Kitchen, Living Room, Dining room, Bathroom One, Bathroom Two, Bedroom One, Bedroom Two, Bedroom Three, Bedroom Four, Storage room, Upstairs, Downstairs, Room One, Room Two, Room Three. |
Use the Google action
Everything should now be set up. Start talking to your assistant. You can start with saying things like:
- “Talk to Dimplex Capa”
- “Ask Dimplex Capa to increase temperature”
- “Ask Dimplex Capa to decrease temperature”
- “Ask Dimplex Capa to set temperature”
- “Ask Dimplex Capa to change mode”
- “Ask Dimplex Capa to get next mode”
- “Ask Dimplex Capa when mode ends”
When you get more comfortable with the system and don’t require prompts, you can try phrases like:
- “Ask Dimplex Capa to increase temperature in Kitchen by 2 degrees”
- “Ask Dimplex Capa to decrease temperature in Bedroom One by 3 degrees”
- “Ask Dimplex Capa to set temperature in Kitchen to 22 degrees”
- “Ask Dimplex Capa to set normal in Kitchen”
- “Ask Dimplex Capa to set constant eco in Bedroom One”
- “Ask Dimplex Capa to set eco in Kitchen until 3pm”
- “Ask Dimplex Capa to set constant comfort in all zones”
- “Ask Dimplex Capa to get next mode in Kitchen”
- “Ask Dimplex Capa to when mode ends in Kitchen”
You do not necessarily need a Google Home speaker to use the action. If you have the Google Assistant app on your phone/tablet, the action works exactly the same.